Thursday, July 22, 2010

Birthday Baking: Candice 7/22

Today, we are celebrating our friend Candice's birthday. Candice does not eat many sweets. She's a very healthy lady. She works out and eats right so when she asked us to bake Cinnamon Cupcakes, we knew it had to be good.


Sara went to work researching a recipe and found a great starting point at the blog for Pink Parsley Catering. The funny thing is that when you consider where this recipe came from, this was not the start. Behold the great mystery of blogging: it's like the game telephone. Pink Parsley changed up the recipe from Annie's Eats, who got it from Southern Grace who took it off of Epicurious. They all made their changes along the way and so of course we changed it up a little too. :o) We'll spare you the details of what changes were made when but you can track them yourself with the links above if you are so inclined.


Years and years ago, Sara got the idea that we should have a pumpkin cheesecake for Thanksgiving. Back then, Erin was the only one who baked so she took up the task. The recipe was from the Nestle website Very Best Baking. The spring form pan that was available was too small to hold all of the batter so little pumpkin cheesecakes were made with the rest. The little ones get baked for about 20 minutes and from there a tradition was born.  Friends and family beg for this sweet every year, most vocal of whom is probably Candice. These will most likely be made again this year in the Fall but not for the purposes of this blog as one of the rules is to not make something we've made before.


Candice wants these cheesecakes year round but she knows that Erin will only make them in the Fall but that's probably a good thing. Since it is her birthday though, we decided to make the frosting in the vein of her favorite sweet and went with the Pumpkin Frosting found on the Pink Parsley site. It's very similar to the frosting we used for Oliver's Cupcakes which Candice loved so it'll be the perfect treat for her if she doesn't explode from excitement.


We wanted 24 cupcakes so here's what we used:
2 Cups of All Purpose Flour
1 1/2 tspn Baking Powder
2 tspn Ground Cinnamon
1/4 tspn Ground Nutmeg
1/4 tspn Salt
1 Cup of Whole Milk
1/2 Cup Unsalted Butter
4 Eggs
1 3/4 Cup of Sugar
1 tspn Vanilla

The oven was preheated to 350. We sifted the flour, cinnamon, nutmeg, baking powder, and salt together (this part smells so good!) The butter was melted and combined with the milk. These mixtures were both set aside.
We used the standing mixer to cream the sugar and eggs together, then added the vanilla. The flour was mixed in like we've learned to, a little at a time. Then we mixed in the milk and butter. 
The cupcake liner were filled 3/4 full (or maybe a little less, there could have been more.) Then baked for 15 minutes. That's all it took.


We wanted to do the frosting in the morning so that it would be freshest. Again, this is Candice's Birthday and she doesn't normally eat sweets. We try to make it so that everything we bake is so good that it's worth the calories but never more so than today. So, we woke up at 5 to take the butter and cream cheese out of the fridge then went back to bed for an hour. The frosting goes like this:
6oz of Cream Cheese (or 3/4 of a package)
1/2 Cup(1 stick) of Butter
4 Cups of Powdered Sugar
2 tbspn Pumpkin
1 tspn Vanilla
1 tspn Cinnamon

Cream the butter, cream cheese and pumpkin together until light and fluffy. Add the vanilla and cinnamon, then slowly add and mix together the sugar. Easy! And wow, it's really good!


So there they are, Cinnamon Cupcakes with Pumpkin Frosting. They are quite delicious. Happy Birthday Candice! We hope you have a great one!


Lessons learned: These are really yummy! We might try to fill the cups a little more next time. There's nothing wrong with 22 cupcakes or 20 cupcakes. They don't have to be in dozens.

Monday, July 19, 2010

Crack Pie 7/16

Soon after we started this blog, the LA Times had an article on a baked delicacy that sounded too good to be true. The famous restaurant Momofuku Milk Bar in NYC has a popular dessert called Crack Pie. There's no chocolate, no fruit, no meringue.  What could it be then that make this pie so good? What makes people willing to shell out $44/pie for this? This week, we set out to find out.
To begin with, there's an oatmeal cookie crust. To get there, we had to make the oatmeal cookie. This was easy and fine. The recipe calls for rolled oats, this is the same thing as old fashioned oatmeal so that's what we used.  It was fun to make one large cookie, let it cool and then break it up.


We put the cookie into the food processor with the butter, sugar and salt. We're familiar with this because we've made graham cracker crust like this before and it actually tastes very similar. Erin's new co-workers thought it was graham cracker. When it all gets chopped up in the food processor, it seems that the oatmeal bits get lost or pulverized anyway. 


We didn't use all of the crumbs but it took a little effort and time to get it tamped down into the pie tin with a spoon. It does look pretty doesn't it? Here's where our experience and this pie diverge. Instead of baking the crust for a little bit, it gets put aside, no pre-baking the crust.


The filling was prepared next. We mixed all of the dry ingredients together first including the milk powder, an ingredient we used here for the first time. This stuff is a little weird in that there are some clumps a little bigger than the rest. We hoped that they would dissolve in the heavy cream, vanilla, melted butter and 8 eggs! It did pretty well. 


This recipe makes two pies so we split the mixture between the two tins. It's very custard like in consistency and color.


We baked them one at a time as the recipe instructed. The hard part here is that the gauge for when it's done is to see when it's barely jiggly. This calls for opening the oven and poking the side of the tin and visually measuring the seismic activity. Unfortunately this also means letting out the heat every time we tried to test it. This extended the heating time but quite a lot because we were still a little nervous about baking times after the Tres Leches Cake. We found that a better way to notice when it is done is when the filling just starts to bubble up. The LA Times noted that you'll be worried that your pie is undercooked but have faith, it's safe.


This is a picture of the pie after it had chilled overnight in the window sill in the morning light. They say to serve it chilled. Erin cut a piece out for Sara to have later and took the rest to work. She couldn't help but have a taste while cutting into it and felt the need for more shortly after. This pie is almost fictitiously delicious. Its very sweet but it has a slight saltiness to it that adds an intriguing dimension. It's true that it is not a pretty pie, nor is it for everyone. This pie, as with many baked goods is nowhere near the healthy side of the food spectrum but in moderation, it is way up there on the fantastic and scrumptious, perfect for a special occasion meter.
Here is the recipe:
btw Scant means a little less than. How much less than? We did not very much less than. Just don't use more than. Maybe the pies will turn into gremlins...
Oatmeal Cookie for the Crust
2/3 cup plus 1 tablespoon flour (we used a little less, it didn't seem to matter)
Scant 1/8 teaspoon baking powder
Scant 1/8 teaspoon baking soda
1/4 teaspoon salt
1/2 cup (1 stick) softened butter
1/3 cup light brown sugar
3 tablespoons sugar
1 egg
Scant 1 cup old fashioned oatmeal

Preheat to 375.
Sift together the flour, salt, and baking powder, set aside.
Beat the butter, brown sugar and sugar until light and fluffy.
Whisk in an egg until it's all mixed in.
Mix in the flour mixture. Do so in 3 parts, fully mixing it in each time.
Add the oats and fully combine it all.
Spread it onto a 9 x 13 baking sheet or pan. Bake until just brown and set. This should take about 20 minutes.
Let it cool and then crumble it up for the crust.


The Crust
To make the crust, we were sure to have the butter at room temperature for easier incorporation.
1/4 cup (1/2 stick) butter
1 1/2 tablespoons  brown sugar
1/8 teaspoon salt
We threw it all into the food processor with the cookie crumbles and turn it on. It worked fine. Spoon the crust into the tins and press it in. Set them aside.
The Filling
1 1/2 cups sugar
3/4 cup plus a scant 3 tablespoons  light brown sugar
1/4 teaspoon salt
1/3 cup plus 1 teaspoon  milk powder
1 cup (2 sticks) butter, melted
3/4 cup plus a scant 2 tablespoons heavy cream
1 teaspoon vanilla extract
8 egg yolks
2 prepared crusts
Powdered sugar, garnish
Preheat the oven to 350.
Mix up all of the dry ingredients.
Then, whisk in all of the wet ingredients but leave the egg yolks for last.
The egg yolks need to be gently whisked in. You want it just mixed but with very little added air.
Now, divide the mixture between the two crusts and bake one at a time.
350 degrees for 15 minutes then reduce the temperature to 325 and bake till slightly jiggly. They say 10 minutes but we found it closer to 15. Just keep an eye on it till it starts to bubble, then check for jiggly-ness.
The pie should be served cold and you can garnish with powdered sugar though we didn't find it necessary.
Lessons learned: Believe it or not, we learned what a scant was. In these 6 and a half months, we hadn't come across that in a recipe. We also think we'll try to mortar and pestle the milk powder next time just for easier incorporation. We are also curious about what would happen if we baked the crust for a little bit before the pie. Maybe it wouldn't stick to the pan so badly...

Tuesday, July 13, 2010

Lemon Tequila Tres Leches Cake 7/10

Our friends Jerome and Becky invited us to a Tequila Tasting Party. We've been to one before and it's a lot like a BBQ centered around the vast quality Tequila collection of these connoisseurs of the cactus concoction. They're the biggest foodies we know and we are honored to have their support of this blog.
So what do you bake for a tequila party? Well, upon googling tequila and baking, we were excited to find a recipe for Lemon Tequila Tres Leches Cake. We've been thinking about making Tres Leches Cake and this would be a great opportunity for it to be enjoyed by several people. It's perfect!


First a little history: Tres Leches Cake is very popular in Cental and South America. Many different countries claim its origin and have their own versions. It doesn't seem to be known exactly where it came from or when.  It is believed that the cake is of European influence and is a result of their similar soaked cakes, translated and transported, then fixed up with local ingredients. Canned milks are a product of the 19th century so it can't be older than that. Nestle has claimed popularization by printing the recipe on their cans of condensed milk around the time of WWII. This is a familiar concept, just think about your Nestle Toll House morsels. A lot of information to be found on this dessert is conjecture but one thing is for sure, its delicious. Here's where you can find out more.

This was going to be the perfect cake. We decided on the recipe because of the ingredients. There are no words to express how perfect they are for this party. Here's the list:
1 3/4 Cup All Purpose Flour
1/2 tspn Baking Soda
1/2 tspn Salt
1 cup Granulated Sugar
1/2 cup Tequila 
3 lg Eggs
1 Vanilla bean scrapings
1 tspn Lemon Zest
3 tblspn Lemon Juice
1/2 cup Powdered Sugar
1 tspn Cream of Tartar

And that's just the cake. The ingredients are so exciting because 1)They have Tequila and that's perfect for this party, 2) Fresh lemon juice and zest are always a good thing, and 3) We've never used Vanilla bean scrapings before and its a perfect time to use them since Jerome was the one who gave us the ones we have in our stash of baking supplies.


The recipe comes from Cooks.com. We are not linking to it here because there are several flaws with it. We will explain here how we got ours to work and what went wrong with theirs. Here's how to make it and achieve success:
In a small-medium bowl, sift together salt, baking soda and flour. Set aside.
Separate your eggs yolks from your egg whites. We will use both but separately.
Combine the granulated sugar and the tequila.
Add the egg yolks to the tequila mixture and mix until the sugar is as dissolved as you can get it.
Add 1/3 of the flour mixture and mix till thoroughly combined. Add the next 1/3 and combine again, then finish it off.
Add the vanilla bean scrapings, lemon zest and juice and stir until combined.


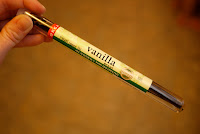
The vanilla beans are new to us but we were up for the adventure. To do this, we cut he bean open length wise (we found it easier to do it in segments but it isn't necessary) and then run the knife along the inside of the bean. We ended up with a paste on the knife that when mixed in to the batter looked exactly like the black flecks in Vanilla Bean ice cream. 

The batter isn't done yet and now it's time for the hard part... Egg whites!
We've run the gamut with Egg Whites on this blog. First there was the Angel Food Cake for Dad's Birthday where the eggs didn't quite puff up probably having to do with some rogue yolk that found its way in. Then there was the Souffle for Mother's Day when we over beat the egg whites. This time we were going to do it right. So, instead of using the mixer, we went with a whisk and some patience.  
The egg whites were roughed up a little, then the powdered sugar and the cream of tartar were mixed in. We whipped it and whisked it for a good long while. We watched this to pass the time. This third time was indeed a charm.

This was then folded into the rest of the batter until it's all combined.

(Its a big pic so you can see the vanilla mmmmm)

Then it went into a 9x13 pan and into an oven at 375 for 20-25 minutes. 

This was our biggest contention with the cooks.com recipe. Aside from stating that the tequila, sugar and egg yolks should be beaten until fluffy (these things do not get fluffy), they recommend that the cake should be in the oven for 50-60 minutes. We found this to be way too long and didn't want to bring a browned cake to the party. We started all over again and found that 20 minutes was plenty of time. Here's the difference:

The darker cake looks acceptable on top but the bottom was not pretty. This happened after only 47 minutes. We wondered if maybe the cake should be cooked longer to become drier and soak up more of the milks but our 20 minute cake had no problem.  It tasted great and there were no complaints. If anyone knows better, please email us.
The milk mixture is easy:
1 cup Whole Milk
1 cup Condensed Milk
1 cup Evaporated Milk
We were nervous about the absorption so we poked holes in the cake. Not sure it was necessary but it didn't do any harm. The milk mixture was poured over top and it soaked in over a few hours. We left it refrigerated till serving and it was as we had hoped: perfect.


Lessons learned: Don't trust cooks.com or at least pick a recipe that had reviews. Also, if you're using a new recipe check on your cake frequently, not just near the end.


Sunday, July 11, 2010

2nd Quarterly Challenge-Breakfast 7/4

MMM MMM MMM Now who doesn't like breakfast?  Especially when someone else makes it for ya.

We started a tradition last year of heading up to our house in Northern California for a family get together on the 4th of July weekend of riding motorcycles, BBQ, fishing and just visiting.  We thought this would be a perfect occasion to make a massive breakfast and have enough people to eat and judge.  All in all that morning there were 11 of us sitting around the table.  Being that is isn't our normal house, a few supplies were needed to make the food which (most excitingly) included a new oven.

I(Sara) chose to make Paula Dean's Biscuits with Milk Gravy.  The recipe seemed simple enough and with bacon grease in the gravy, I thought for sure it would be a winner.  The ingredients go together fast but when I turned the dough out to knead, it didn't seem to all want to stick together so I added a couple of tablespoons of water. 


I guess this should have been an indication of the dough needing a bit more fat to increase the fluff later.


Also, Erin suffered the first burn of this Bake Odyssey while helping with the skillet. It's been 6 months, not bad. It could have happened a lot sooner. Kitchen towels are an adequate substitute for pot holders but make sure they are dry and you have several layers between you and hot metal. Don't worry it was healed in a day.


Here's Erin:
I made Cranberry Blueberry Muffins. Blueberry muffins sounded good but then our Mom mentioned having enjoyed a Cranberry Blueberry Muffin at the Farmer's Market and that sounded great. Again the limitations of the kitchen had me mixing the dough up in a butter tub but it worked fine. No complaints here. Reduce, REUSE, Recycle.


The recipe called for 1/2 cup of blueberries but I wasn't using the little ones that you get with the box mixes. I had large fresh, organic blueberries so I piled them up just a little.


So when it came to dividing up the dough, it said to fill the cups 2/3 full and I thought I did. It said that it makes 12 muffins but i had more dough than that so I made 6 more. The result was small muffins. If I just divided it evenly among 12 cups, they would have been more muffin like but it turns out that our family liked them as is. Our cousin Bryan expressed some distaste for cakey muffins so they were a hit with him. I made a little honey butter to go with them and was happy with the result.


When we did our last challenge, we ended up making a third recipe together because we just couldn't help it.  So this time, we made Sausage Potato Quiche. We figure this would be a good balance to our breads.  We've heard that "real men don't eat quiche" but we figured that sausage and potatoes were definite man food so we took the risk. There is an amazing local butcher up near the house called Swingle Meat Company.  We stocked up for the whole weekend. If you are ever up there we highly recommend stopping in for beef jerky or one of their marinated tri-tips. This is their sausage.


Shredding the potato is really hard when you don't have the right tools (we only had a grater with tiny holes in it) so we really missed our food processor.  Especially since we doubled the recipe, that makes for a bunch of potatoes to shred. We cheated a bit after Sara's arm about fell off and chopped them up instead, with the help of our sister Kat.
The potatoes made up the bottom crust of the quiche. Then is was filled with the sausage, onion, cheese and the egg mixture.

In the end it was the Sausage Potato Quiche that won everyone over.  We have dubbed this quarterly challenge "Man Food and a Muffin."  Maybe that will be the title of our blog for 2011...


Lessons learned: Don't under estimate the power of good tools.  When making breakfast, Sausage or Bacon are your best bets.

Friday, July 2, 2010

Salted Caramel Chocolate Cupcakes 6/27

Last weekend we went to a birthday party in Seattle. Our cousin George is turning 70 and for such a momentous occasion, there were cupcakes! The mini cupcakes shown above are from Trophy Cupcakes and we fell immediately in love with the Salted Caramel ones. They're the ones with with the caramel drizzled on top. There were lots of dimensions of flavor, multitudes of deliciousness and those puppies went fast!
Then, one night last week during a bit of insomnia, Sara was looking through the Martha Stewart Cupcakes book and found...Chocolate Salted-Caramel Mini Cupcakes! This is a great book and many of the recipes can be found at marthastewart.com. This one isn't there but it's easily found online as lots of food bloggers have done it. There's even a Martha Stewart Cupcakes baking club. Here's how ours went.

The cakes were easy enough. We've never made mini ones before but there's a first time for everything. We had to buy new pans and get the smaller paper liners. We do believe there is an appeal to smaller cupcakes though. They're pretty high on the cute scale. Then we took them and stabbed them with a knife and ripped out their insides. Well, made room for caramel is more like it. It was a great start but then on to the hard part.

Another first for us with this recipe was homemade caramel. The Martha Stewart book said to use a candy thermometer. We didn't have one of those so we consulted Joy the Baker's blog. There's a video there on how to make the caramel. It was very helpful. 


First, we had to take the water, sugar, and cornstarch and get it boiling. It all melts down and we had to be brave and let it go. No stirring after it gets boiling. It should keep boiling for about 10 minutes or until it gets brown and nutty in aroma.


We could have probably let it get a little darker but it was still tasty. We'll try it next time. Next step, add the cream. You thought we were wimps for being scared to burn sugar, you should have seen us when the cream went in.

We had to pour it in slowly because it all just boils up in the pot. We missed the best picture moment but you can get an idea here of what it did. It was very exciting! Then it gets some salt added and it all goes into the cakes. Lots and lots of cakes. 


These got topped with a little bit of sea salt and then frosting went on top of that. The frosting recipe was a little rich. It called for a whole pound of melted semi-sweet chocolate. We also had a lot leftover because the recipe makes over 50 mini cupcakes and we threw in the towel at 36 which we thought was quite respectable.  They came out pretty gorgeous if we do say so ourselves.


As you can see, the tops get a little more salt. The salt draws out another dimension of flavor in the caramel but we felt it was a little too much salt. We'd scale it back next time. A lot of the time, you can end up with something pretty terrific that's homemade, better than from a store or bakery but in this attempt, we stick with Trophy Cupcakes. Now, if only we lived near Seattle...

Lessons learned: For next time, reduce salt, extend caramelizing time.  We also had a snafu with the quantity. These cupcakes are to be consumed within a day of making. Normally, we can rely on Sara's co-workers to enjoy the treats. Though some of them absolutely loved these cakes, a majority of the treats went untouched. We believe that we have reached the tipping point of goodies overload. It's not bad for 6 months in and a good thing that Erin starts a new job next week. :o)